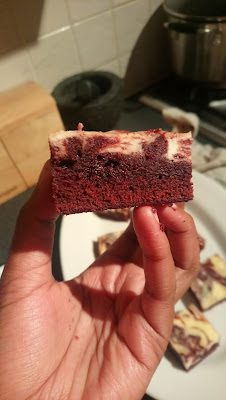
Red Velvet Swirl Cheesecake Brownies
I've got to admit, the name for these brownies is long, but it just goes to show how much goodness there is inside of them. You like brownies? You like cheesecake? Is red your favourite colour? Well this is the recipe for you. Now this recipe is Sunny Anderson's. The woman is literally like her name, big, bright and beautiful. Even by just looking at these brownies, you can see her reflected in them. They are so gorgeous to look at with the white and red swirl. Of course, their beauty did not deter people from eating them. I made 32 of them, and they were munched up in less than 32 minutes. Not at all that complicated to make and I am going to show you how!

The last thing to do was to gently fold in 100g of plain flour. Sunny adds walnuts next into her recipe, but I didn't add them just in case someone from my church had an allergy to nuts. I would have loved that extra texture and if you want that, add 50g of chopped toasted walnuts.
I began by pre-heating the oven to 180 degrees.
Then on the hob, I melted 113g of butter slowly and gently. I'm sorry for the random measurements in this recipe. As it is an American recipe, all the measurements were in cups, sticks and ounces, so I have converted them into grams for you.
Back to the butter! Whenever I melt butter on the hob, I avoid any sizzling, otherwise it will begin to become brown butter, which as the name suggests is brown and nutty in flavour. If yours does start to sizzle, turn down the heat and swirl the pan. Once melted, I left it to cool slightly.
In a separate large bowl, I put in 175g of caster sugar, 25g of cocoa powder, 1 teaspoon of vanilla extract and the same amount of vinegar. Any vinegar you have at home will do, I used balsamic. And then finally, one big table spoon of red food colouring. I believe gel food colouring is the best one, or if you can get it, the paste food colouring. That's the one where you can add a drop and it'll transform your dish into a piece of the rainbow. I used gel in this case.
This was whisked together until smooth.
Now to make this mixture even more luscious and smooth, I cracked two eggs into a separate bowl and whisked them. This was then incorporated into the chocolate party in my first bowl. And as I was whisking them together, I could see the mixture becoming silky and rich.

The last thing to do was to gently fold in 100g of plain flour. Sunny adds walnuts next into her recipe, but I didn't add them just in case someone from my church had an allergy to nuts. I would have loved that extra texture and if you want that, add 50g of chopped toasted walnuts.
Now I have to admit, my mixture did not look so red, more like a copper red - but you know what? This is home baking, not a product of some French pastry school. I guess the lesson here, if anything, is to buy food colouring paste.
I made sure to reserve a 1/4 cup of the mixture, which is like 60ml, and poured the remaining copper red batter into my red silicone brownie tin.
Now for the cheesecake topping! In my last and final bowl, I added 300g of cream cheese, which was at room temperature, 44g of caster sugar, 1 egg and 1/2 a teaspoon of vanilla extract.
This was whisked together until smooth and then I simply poured this on top of the brownie mixture in the tin.
The brownie mixture I had reserved was next to be dolloped in blobs on top of this. Now you may notice that your brownie mixture has gone stiff. Not to worry at all! Here's a tip: pop it in the microwave for 30 seconds, making sure to check it after every 10 seconds. The heat will loosen the batter, but not start to bake it. When it is looser, it is easier to swirl.
After I had dolloped the brownie mixture, I used a toothpick and dragged it from one blob to the next until a beautiful marbled pattern emerged. Make sure not to over swirl, otherwise you will lose the marbling effect.
My masterpiece was then put into the pre-heated oven to bake for 30 minutes. When ready, the cheesecake topping had firmed up with just a slight wobble.
When cooled, I cut it into 16 little squares and made a second batch!
They actually looked a lot more red when baked, so beautiful and chic! You'd think with all the chocolate and the cream cheese they'd be heavy, but they were the lightest little things, so dainty and cute - Dorothy eat your heart out.
Ingredients:
Red Velvet Brownie:
- 113g Unsalted Butter, melted
- 175g Caster Sugar
- 25g Cocoa Powder
- 1 teaspoon Vanilla Extract
- 1 teaspoon Vinegar
- 1 tablespoon of Red Food Colouring
- 2 Eggs
- 100g Plain Flour
Cream Cheese Topping:
- 300g Cream Cheese
- 44g Caster Sugar
- 1 Egg
- 1/2 teaspoon Vanilla Extract
~ Pre-heat Oven to 180 degrees


Comments
Post a Comment