Jamaican Patties
First savoury bake on Sophistibakes! I created this recipe back in 2013 after an extensive amount of research. I am not Jamaican, so I had to make sure that I studied the websites and blog pages of Jamaican cooks so I could create authentic patties. I also had to make sure I created a shortcrust pastry that was light, crisp and flavourful. I remembered the basics to making shortcrust pastry from school, which felt like an absolute disaster at the time - the making of it, not the taste. But I have learnt that one should never be afraid of making pastry. Yes they sell it in the shops now, but I haven't seen them sell any infused with curry powder like mine. The key to making pastry is to always have your flour to hand. Spread it on your surface, spread it on your rolling pin, spread it on your hands because the stickier things get, the more stressed you'll get. As for the filling, it is a very spicy mix of beef mince and sweet peppers, however combined with the pastry, you get very moreish parcels of fun. A nice chilled drink of your choice and you're ready to go!


This recipe begins with quite a lot of chopping. Play some music in the background like I do when I make these and you won't even realise.
So I begin by chopping up 2 medium onions (or 1 large one), 3 garlic gloves, 1 red pepper, 1 orange pepper and 1 yellow pepper. I dice the onions and chop the peppers into small chunks, trying to make them as square as possible. You don't want them largely cut otherwise when biting into a patty, someone might bite into a giant piece of onion or pepper. You want everything in consistent little sizes. I just slice the garlic. I think it all rather looks pretty on the chopping board - but that's just me!

The next thing to do was to fry the mince. In a large pot I add the mince, with no oil, and let it fry in its own juices. This was 3 packs of 500g mince - a lot but I was making them for an event. I make sure to stir the mince so it doesn't clump together.

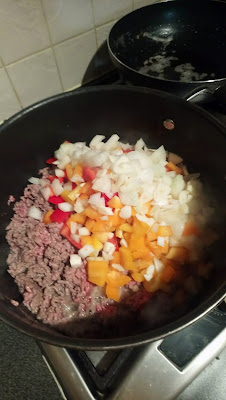
When I notice that there is quite a significant amount of beef fat at the bottom, I add the chopped onions, garlic and peppers so they can fry in it. I don't know if you can call these healthy, but I like to think they are because I don't add oil.

Once the onions have gone slightly translucent, the peppers softened and the mince completely browned, I pour in 200ml of beef stock. I make the stock by adding a beef stock cube to freshly boiled water. Next is the exciting part: my melody of spices and herbs. In goes: 2 teaspoons of dried thyme, 1 teaspoon of all-spice, 2 teaspoons of chilli flakes, 1 teaspoon of dried rosemary, 1 teaspoon of cumin, 1 teaspoon of paprika, 1 teaspoon of turmeric, 2 teaspoons of cayenne pepper and 1 teaspoon of mild curry powder. A few dashes of Worcestershire sauce and salt and pepper to taste and there you go! If you don't like food that is spicy, you are more than welcome to cut it down and if you need more spice, add more!


I let this all simmer on medium-low for around 15 minutes, making sure to taste beforehand to see if I am happy that all the flavours sit together well. Most of the time I add more chilli, I love my food hot.
The next stage was to add breadcrumbs to absorb any excess liquid. Every time I make this, I add a different amount of breadcrumbs. Sometimes I return to the pot and see the beef and peppers have soaked up the all liquid, sometimes I return and it's still all there. It's all got to do with the science of temperature, but I won't get into that. So what I do is sprinkle in the breadcrumbs, little by little until the filling gets to a consistency I'm happy with. You want a filling that is still moist but not wet and drowning. I would even suggest adding your breadcrumbs a tablespoon at a time to be on the safe side and as you add them, stir your filling to see how it reacts to them.

To know if I am happy with the consistency, I draw my mixture to one side of the pot. If I can see the bottom of the pot, I know that I have added enough breadcrumbs.

And that's the filling finished. I turn off the heat and focus on my pastry.
Now a lot of pastry is needed to envelope this filling. But I make it in 4 batches, chilling them in the fridge as I get on with another.
The first thing to do was to bring out all the ingredients set and ready to go in front of me. Weighing scales, 1kg of plain flour, curry powder, salt, 440g of butter, a jug of warm water and an egg wash of egg, a little bit of water and a teaspoon of turmeric. The turmeric gives the pastry its golden colour.
So I measure out 250g of plain flour and put it in a bowl along with 1 teaspoon of curry powder, 2 pinches of salt and 110g of butter cut into cubes. The butter needs to be soft, but not too soft. Firm enough to cut into cubes. It should be cold to ensure a flaky crisp pastry.


Next I had to rub the butter into the flour. This requires one to use the pads of their fingers and thumbs to mix the butter into the flour. It's a bit like sprinkling, you use that same action to break down the butter into the flour. Do not use the palm of your hands! You want the mixture to resemble breadcrumbs. If your thumbs start to ache, you're doing it right.

To make sure you have broken down all the bits of butter, you can shake the bowl a bit and the big pieces will come to the surface.
Next comes the part where most people start to stress out: the adding of the water! Now to be on the safe side again, I add the water a table spoon at a time (if I'm patient enough) stirring as I am adding to encourage the dough to stick together. You know it's enough water once it clumps together.


When clumped, it's time to be done with the cutlery and to use your hands. It should all come together to form a nice clean ball. If the mixture is too sticky, I simply sprinkle in more flour in the bowl to remove some of the wetness. If it is too dry, it won't stick together and the mixture will need some drops of water.

I wrap my ball in clingfilm and then leave it in the fridge while I make 3 more batches.
By the time I am done with the fourth batch, the first one is chilled and firm, ready to be rolled out. It's best to leave these in the fridge rather than sculpting with them straight away because then they firm up and they are a lot easier to roll out and handle.
Sprinkling flour all over the work surface and on my rolling pin, I plop the pastry right into the middle of it. As I roll my pastry out, I make sure to rotate it, but I do not turn it over. The rotation makes sure it doesn't stick to the surface and helps me roll out a large piece. I roll out my pastry until it's around half a centimetre thick. And using my trusty cereal bowl (I really should have a pastry cutter by now...) I cut my circles. You can make these patties any size you want. My bowl is around 15cm long.

Using a little pressure, I cut out all my circles by rotating the bowl. I remove the uncut pastry around the edges and roll this into a ball ready to be rolled flat and cut again. Any left-over pastry gets added to the other batches.
My filling, now cooled, is spooned into the middle of my circle. I add around a tablespoon of the filling, lining it in the centre.

I then bring the left side of the pastry over to the right side to close it. Then using the pads of my fingers I seal the edges with a slight rubbing action so the pastry can stick together.


And then using a fork, I press down on the edges to crimp them. This will also guarantee a sealed edge.

This sealed patty is then placed onto a baking tray lined with baking parchment. On there I brush on the egg wash so they can be shiny and golden when they come out the oven.

The last thing to do was to prick the top twice with a fork so steam can escape and they don't explode.


They go into an oven pre-heated to 180 degrees to bake for 20 minutes. You know the pastry is ready when it has a hard bottom and the edges are golden.

This recipe may seem long winded but you really taste the quality and the effort that has gone into them. I think I spent all night and into next day making them and they were all eaten in less than an hour. But thus is the life of a baker. You put in so much love and care and attention to detail in your creations in order to make other people happy. So why not make your friends and family happy with these sunshine golden pies.
Makes 30-35 patties
Ingredients:
For the Filling:
- 2 medium onions, diced (or 1 large onion)
- 3 garlic cloves, sliced
- 1 red pepper, chopped into chunks
- 1 orange pepper, chopped into chunks
- 1 yellow pepper, chopped into chunks
- 1.5kg beef mince
- 250ml beef stock
- 2tsp dried thyme

- 1tsp all-spice
- 2tsp chilli flakes
- 1tsp dried rosemary
- 1tsp cumin
- 1tsp paprika
- 1tsp turmeric
- 2tsp cayenne pepper
- 1tsp mild curry powder
- Worcestershire sauce
- Salt and Pepper
- Breadcrumbs

For the Pastry:
- 1kg plain flour
- 4tsp mild curry powder
- 8 pinches of salt
- 440g salted butter, slightly softened
- Cold water
For the Egg Wash:
- 1 egg
- 1tsp turmeric
~ pre-heat oven to 180 degrees

Comments
Post a Comment